I’ll apologise now for the length of this blog post. Although I began it as just a summary of the my time away in Scotland it has quickly become a recap for those who attended the course. And it turns out I have a lot more to say than I anticipated. So if this is too much detail then just feel free to look at the pictures.
It was my intention when setting out to do these workshops that I provide the type of lighting course I would have wanted when I was starting out. I wanted to include all the elements that took me several workshops and seminars over several years to piece together, some of which I’d not actually taken the time to fully appreciate until recently. So I began with the basics and worked my way up to include all that is necessary to understand light for good, consistent portraiture.
We began with light patterns and their uses, the position of the lights to achieve the various light patterns and the catchlights you’d expect to see for the patterns.
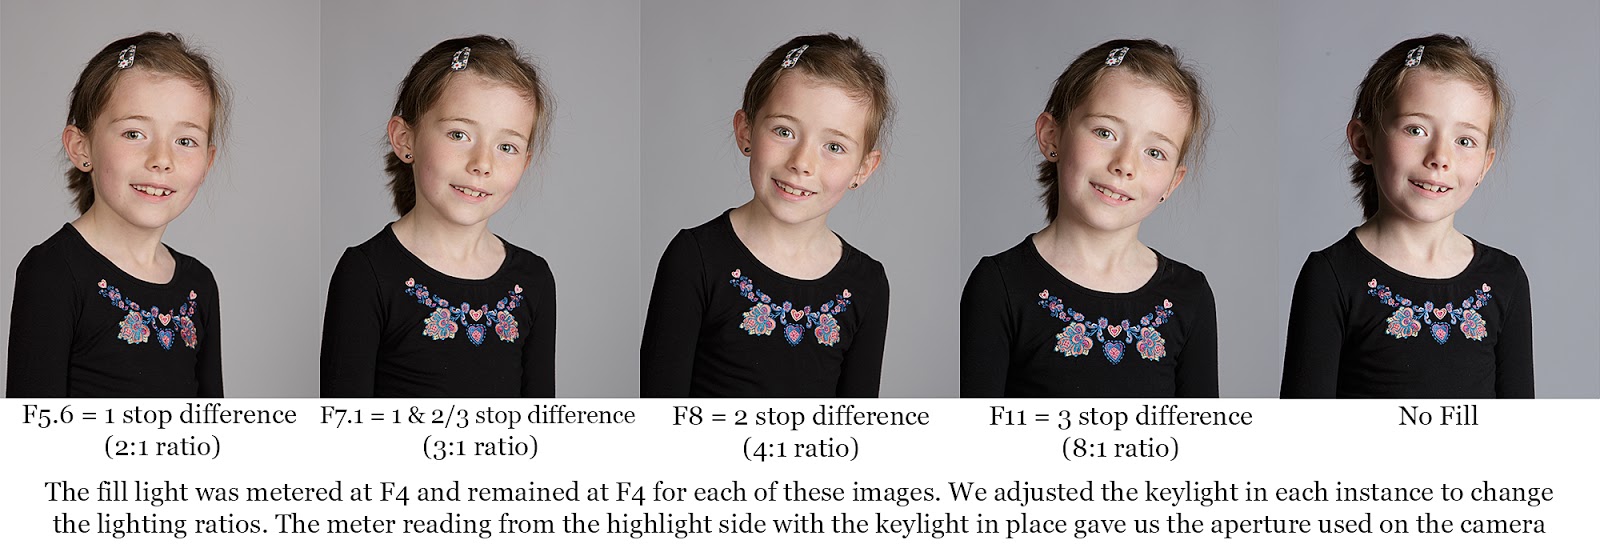
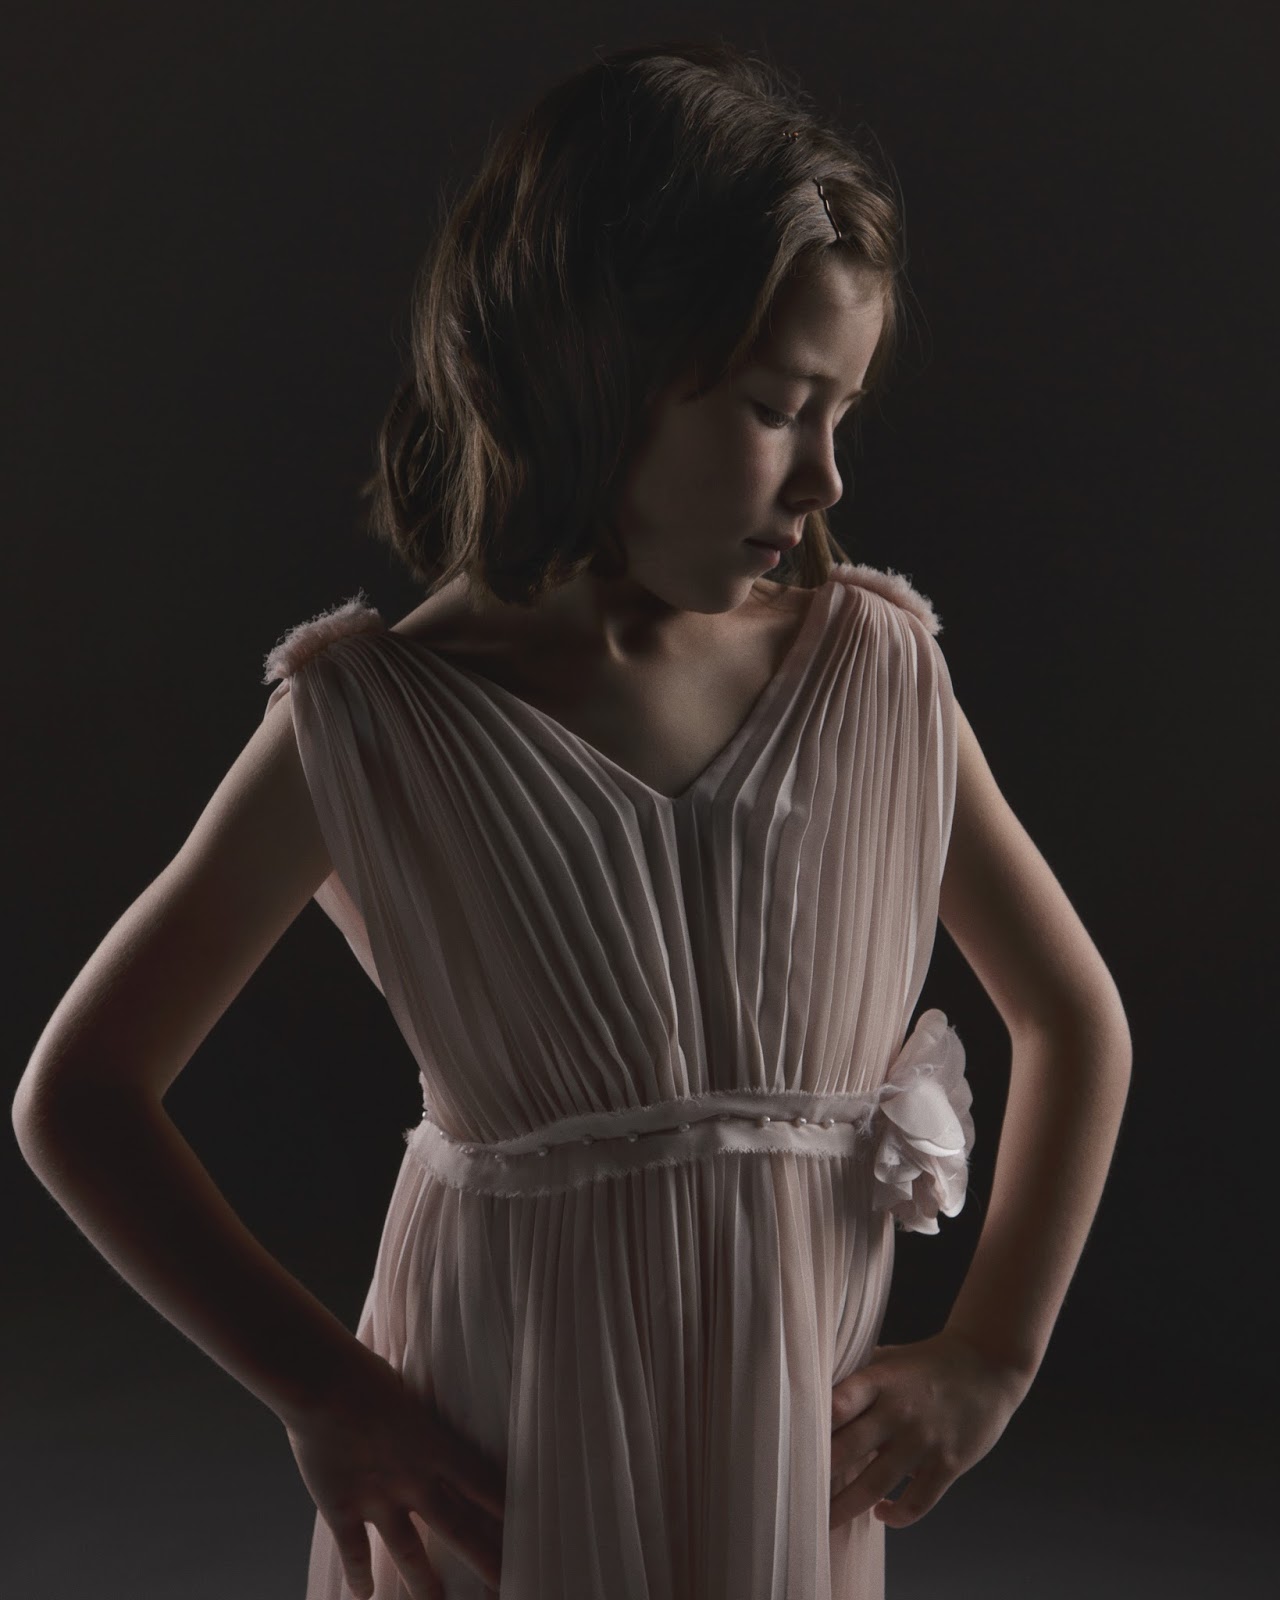
I began my lighting demonstration with lighting ratios. I have hardly ever seen this covered in workshops and never fully appreciated what understanding this could mean. I’d always felt that setting your fill light was a personal judgement based on what you see. To some extent this is still true. But it wasn’t until I did the exercise of seeing the differences between all ratios in my typical lighting set up that I realised where my preference lies. In some cases in the past I got it wrong. I judged the outcome based on what I saw in the back of my camera but when I got it on the computer I saw that the shadows were too dark and I wasn’t as happy with the end results. I was finding that sometimes I got it perfect (for my tastes) and other times I got it wrong. Now that I’ve seen each of the ratios and assessed where my preferences lie I know that I like my fill light to be between 2-3 stops lower than the fill and key combined for most of my work. For darker images I probably prefer 3 stops and brighter images 2 stops. Now if I take the time to meter both my fill and key I get consistent results every time.
Here is the examples we created during the first of our 2 workshops.
In case you are unable to read the details in the above image, the first image we started with a 1 stop difference. This is also known as a 2:1 ratio where the highlights are twice as bright as the shadows. Don’t let yourself get bogged down with numbers here though. It doesn’t matter that you know if something is 2:1 or 8:1. What matters is that you know if its a 1 stop or 3 stop difference so you can calculate your meter readings for each light.
The second image we metered both the key and fill together on the highlight side as F7.1 which is also what we set the camera’s aperture to. The third image metered at F8 for a 2 stop difference. The fourth metered at F11 for a 3 stop difference. For the final image we turned the fill off. Without metering again we’d be left with a slightly underexposed image because we’ve taken away some of the light reaching our subject’s face. Without the fill the meter gave us a reading of F8 and 2/3rds (or F10).
The important thing to note here is the strength of the shadows and your preference for these shadows in your portraits. Because we used a very large light source (140cm octobox) we had a very big and soft light that essentially wrapped around our subject. This produced softer, less defined shadows so the variations are not as pronounced as had we used a smaller light source. But I can still see that I like both the 2 stop and 3 stop difference portraits and I now try to set my lights to achieve this on a consistent basis, whereas prior to doing this I just guessed at where my fill light should be.
Following ratios we discussed perspective and lense distortion and the affects that shooting wide and closer up can have on your portraits. We did an example of this to show how moving away from your subject and zooming in, or shooting with a bigger prime (ie 85mm) can give you more background and minimise the distortion you can get on your subject.
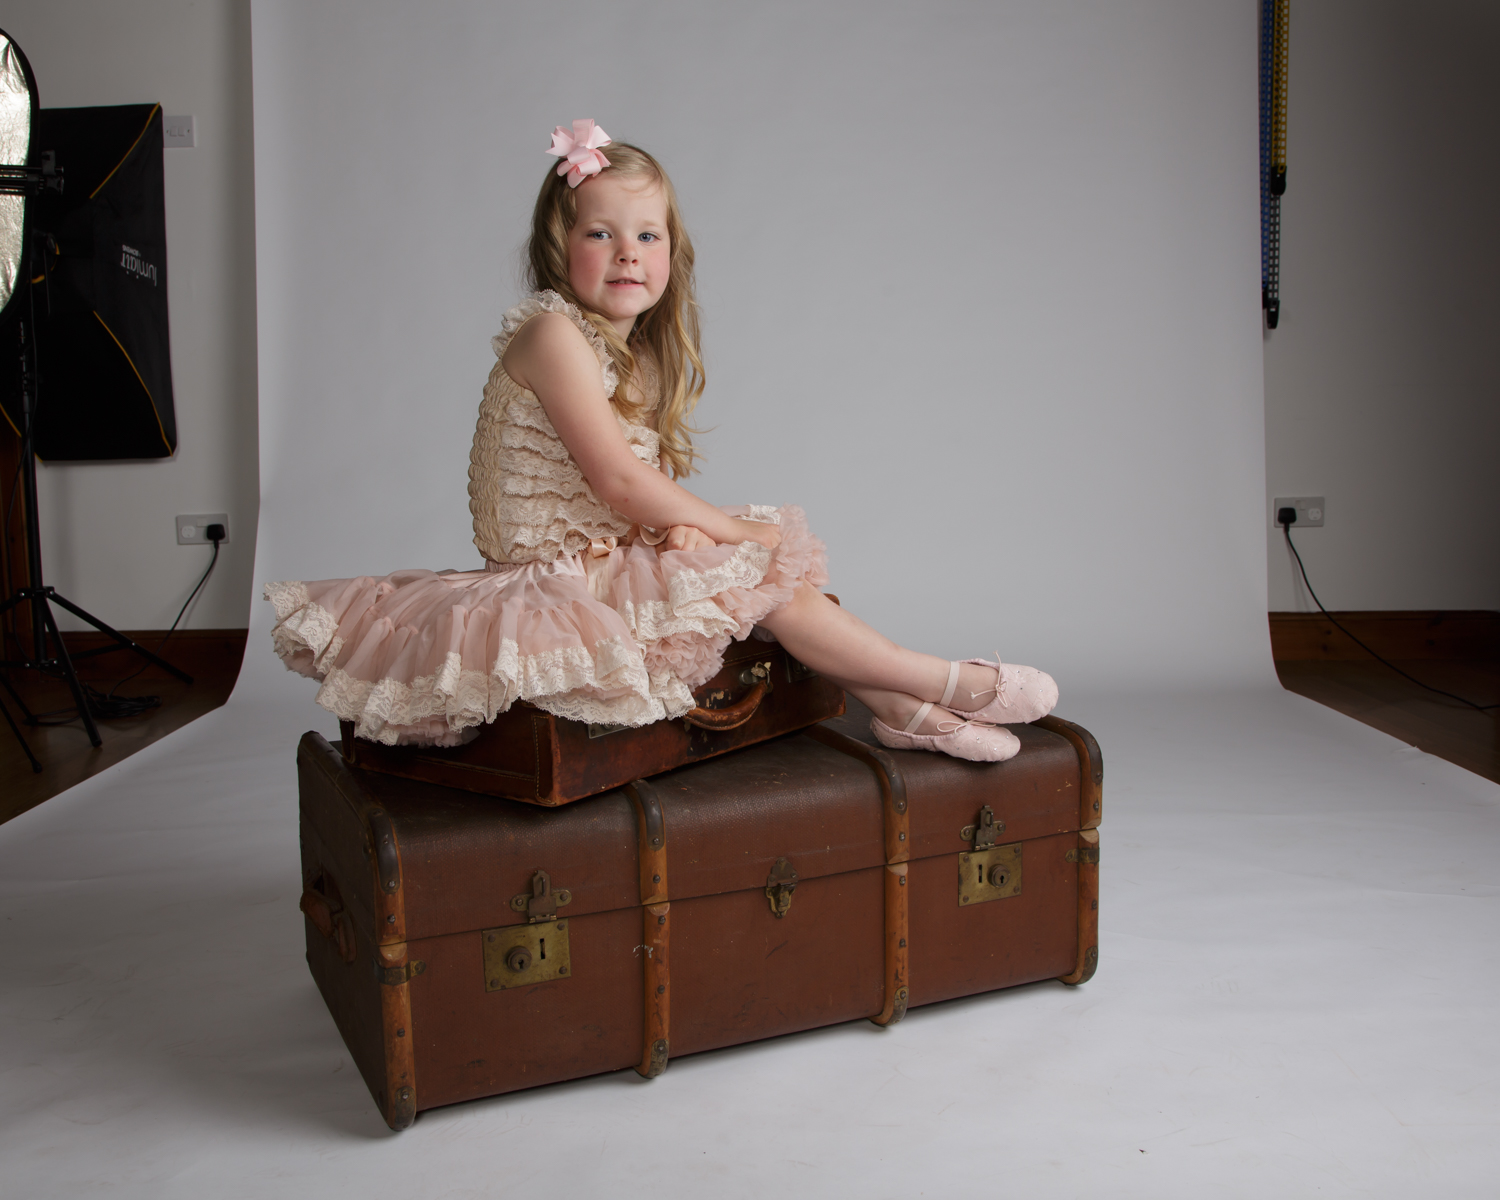
In the example below I went to the extreme to really highlight what happens. Here I shot at 28mm and I was situated quite close. Notice how we are a little limited with the background and we’d have a lot of work in Photoshop to give us the background we would want for this portrait. There is also very obvious distortion in the trunk and possibly some in the little girl as well.
The image above was taken from further away and shot at 58mm instead. The trunk and child did not move from their spot. Notice how the trunk appears to have no distortion and the background has greatly improved. This is incredibly useful if photographing a group of people or wanting to create a set that includes props such as this large trunk. These same principles apply to close ups of faces too. The closer you are the more possibility of distortion, which as you can imagine, is not often desirable in portraits.
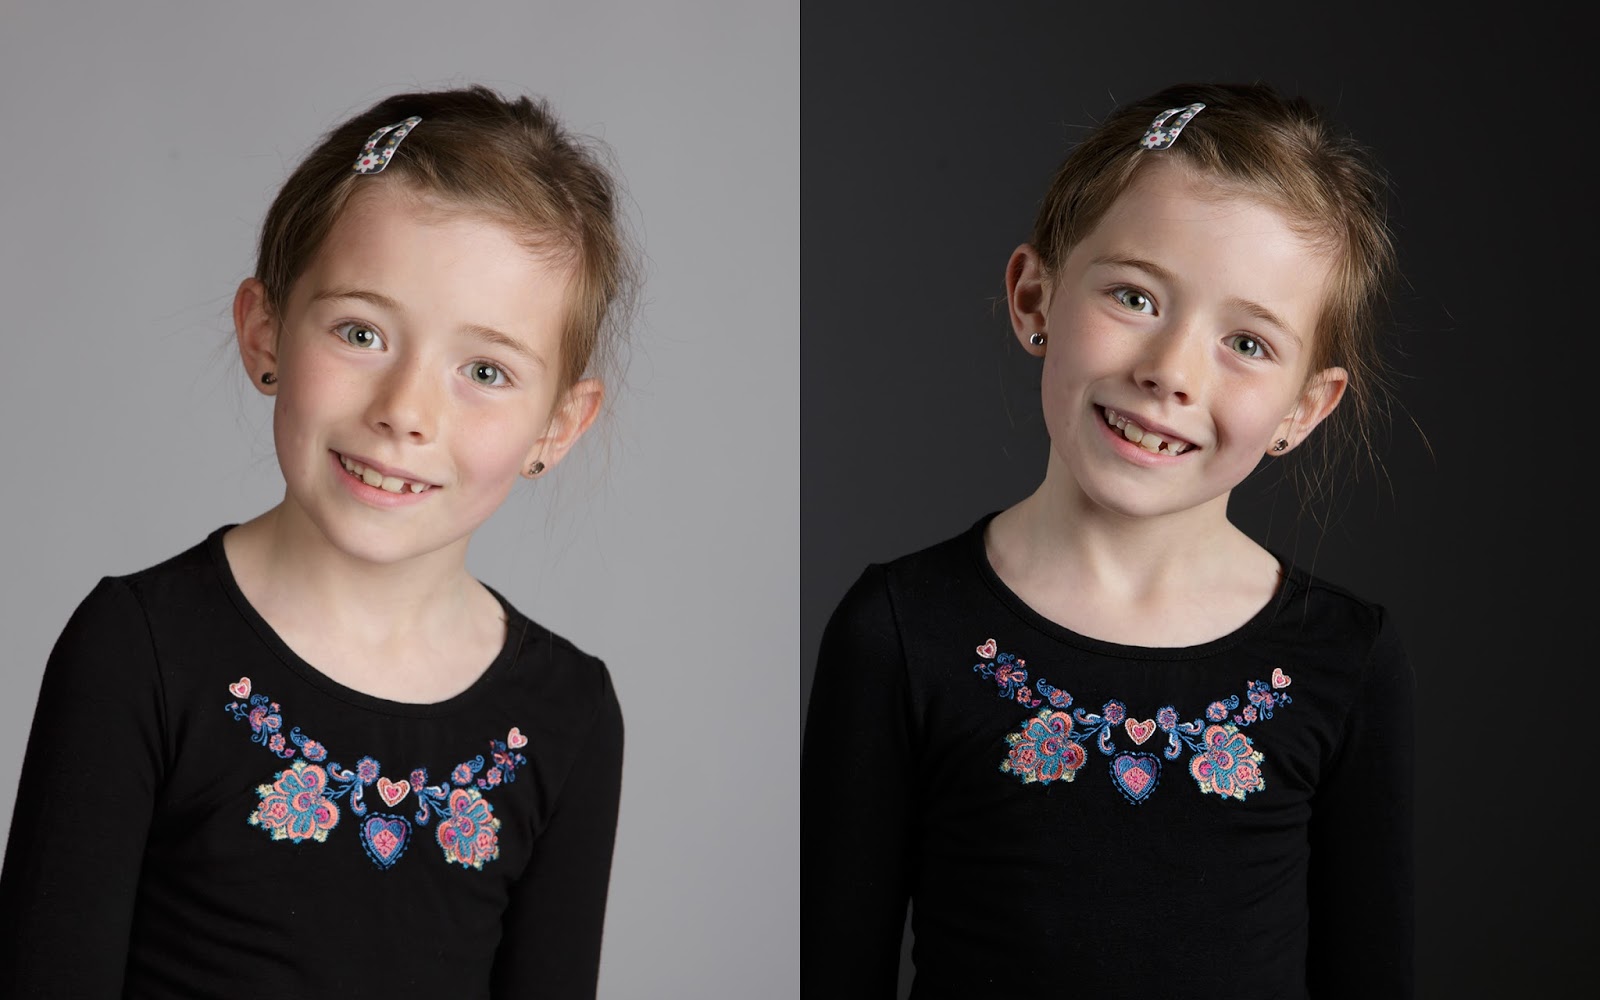
We also looked at the use of grids (or egg crates) along with feathering the light in order to light just our subject so that the background can be left alone. I like to do this so that I can darken my backgrounds and completely change the look without changing the paper I’m using. I will often work with either white paper or light grey but the way in which I light it changes the look. In everything we did during this workshop we used bright white paper. The only way we would actually achieve bright white would be to light it. And if we don’t have any light reach the backdrop we can actually turn it black. Below on the left (and all images above) is an example of where we had light spilling onto the backdrop to give us grey. On the right we used a grid and slightly feathered the light to achieve a much darker (almost black) tone. A very handy technique if you are limited in paper selection. Imagine what you can do with coloured paper as well.

To achieve the image on the right we also needed to switch off the fill light. The softbox used here did not have a grid which would have meant to much light from this light would have reached the background. In order to still have an acceptable light ratio we used a reflector on a stand to provide some fill light without affecting the background.
By the way, all images above are virtually straight out of camera. In lightroom only some cropping and noise reduction have been applied.
Once we covered these lessons in lighting we introduced some styling and posing. I brought a selection of pieces from my collection so we could create some complete portraits of our models and I could show something of my thought processes when doing so. Below are just some of what I created.
It has always been my experience that we tend to retain information if we actually get the chance to do the work ourselves. So I had everyone in the room create their own portrait using these children and the available props in the hopes that this would help in retaining the information discussed during the workshop.
If this type of workshop is of interest to you I am running one similar in my own studio in Burbage, Leicestershire on July 9th.
Click here if you’d like to see more details. Or give me a call on 01455 611069. There are still a couple of places left.


Thank you for sharing Christina. Would have loved to have been there to learn from you but I was elsewhere on this day. Hope to catch you on your return to Scotland. Y x